

Learn how to Automate and Schedule Instagram Posts instantly.
It might sound crazy, but it is actually fairly easy.
Through this growth hacking guide, we will show you how to automate and schedule Instagram posts step by step.
Save precious time by automatically producing content to post on your Instagram account!
We all know that creating compelling, authentic, useful content takes time.
Our goal is to help you spend less time creating and posting content, and more time engaging with your users.
A little effort for HUGE results.
Especially if you are a small company or a startup, this guide is the one for you!
Keep on reading and learn how to automate and schedule Instagram Posts today!
Table of Contents
What you will learn
- How to create 50 unique posts for Facebook and Instagram using a dataset containing text, image, and brand logo on a fixed corporate template design;
- How to schedule a large number of instagram and facebook posts with images and upload them on Buffer all at once.
- How to use photoshop to export data sets as jpg
Point one can be an intimidating task if you’re not totally familiar with data-driven graphics using Adobe Photoshop.
Fortunately, with a little help from your graphic design team, you can streamline these steps. You’ll be able to quickly and effectively produce multiple posts with different text and images for not just your social media platforms but also for print and web projects.
Naturally, these platforms have become a must-go-to place for businesses, big or small, to reach and interact with their new and high potential customers.
Nowadays, a product, service or brand that hasn’t been marketed on any social media sites is just as well as invisible.
In 2021, 4.20 billion people use social media worldwide, making up for more than half (53%) of the global population.
Of those people, 60 percent of Instagrammers claim they learn about new brands and their products while scrolling through their account feeds.

There are lots of benefits for businesses utilizing social media, and Hootsuite does an excellent job at covering this topic in their article “23 Benefits of Social Media for Business”.
But before you can get a better social media strategy, you need followers.
Sure, there are ill-advised shortcuts you could take to boost traffic like adding fake followers and gaining fake likes.
But what’s the point of joining the dark side of social media marketing when you can do it the proper way just as effortlessly?
Grow your following the honest way. That’s the only way your SoMe strategy will deliver real sustainable results over time.
How to increase your followers on Instagram and your group members on Facebook
You can achieve this by:
- Sharing fascinating content;
- Using relevant hashtags;
- Posting on the right day, at the right time;
- Sharing the link to your Instagram account on other communication platforms;
- Engaging with other communities.
In this respect, we suggest that you go take a look at “How to Get Followers on Instagram: The Ultimate Guide” by HubSpot, to learn more about the complete list of tactics.
PART 1
Social media automation. Step by step guide
Keep on reading to learn how to automate and schedule Facebook and Instagram posts with ease!
Step 1. Get the content
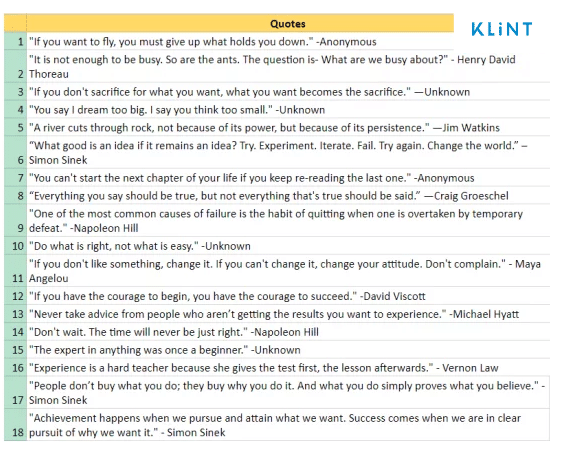
Quotes are inspirational and tend to get a fair amount of engagement within the startup scene.
You can collect all your favorite quotes by hitting a variety of sites.
If you need some inspiration, take a look here.
Build a list of your favorite quotes to always have them ready when needed.
Step 2. Choose the right image
Next, you need to find the most appropriate images to reinforce and convey the meaning of the quote, better if in a metaphorical way.
Feel free to use any of the following online resources that we have collected to help you find royalty-free images with a Creative Commons license (CC0):
- Pexels
- All the free Stock
- Unsplash
- Splash Base
- Startup Stock Photos
- Jay Mantri
- Moveast
- Travel Coffee Book
- Foodies Feed
- Jeshoots
- Pixabay
- Splitshire
- Free Range Stock
- Gratisography
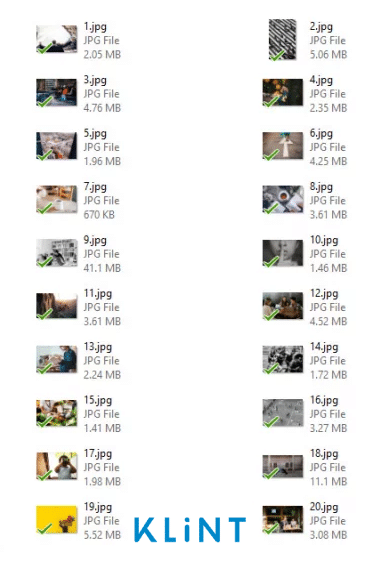
Make sure all images are JPEG files. We recommend you to save the images and rename them using their quotes’ order as 1.jpg, 2.jpg, 3.jpg, etc.
This little trick will make the next step a lot easier!
Please note: Be sure to mention where your images come from for free use.
Step 3. Build your CSV or TXT data sets
Data-driven graphics on Adobe Photoshop requires you to prepare a CSV or TXT file (using Google/Microsoft Docs or Excel) in order to load that file into a PSD document.
Setting up this file is pretty straightforward.
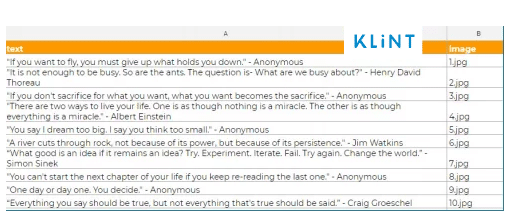
In it, include all the elements of your post that change. In this case, it will be:
- the quotes from Step 1 (listed in Column A that you will rename as “text”)
- the stock images from Step 2 (listed in Column B, that you will rename as ‘image’)
Make sure to pair the quote to its relative image.
Once you are done, your file should look something like this: Quotes – CSV
Remember to export the file to a plain text file (.txt) or comma-separated values file (.csv).
Move the file into a separate folder along with all the downloaded images.
When exported as a (.csv) file, the original excel layout sometimes turns out to look completely different than it should.
So, in case this happens, try to enter data in a (.txt) file instead.
It will work perfectly fine.
Please note (for Mac users): There seem to be a few problems when it comes to using Microsoft Office 365 in Mac, starting from the 2016 upgrade version, where (.csv) files created/edited in Office for Mac 2016 Excel are not readable by the processing applications (like Adobe Photoshop).
Step 4. Open your corporate template design (or create a new one) for this particular project
Use layers to separate the elements that you want to change in the graphic.
Below are our corporate templates:
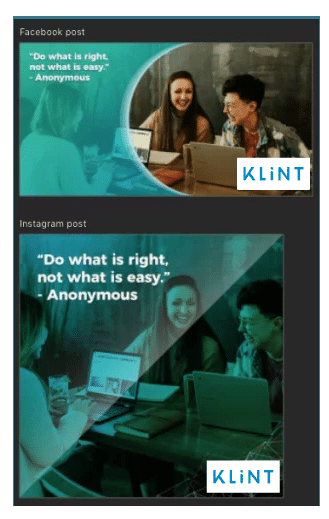
Please note: when creating your graphic, keep in mind the company’s visual identity (logo, fonts, color code, etc). Read “How to Build Social Media Branding Guidelines” and learn more about the matter.
Remember that the template’s dimensions should strictly follow the Social Media Platforms’ requirements for posts.
E.g. Facebook post: 1200px x 628px
Instagram post: 1080px x 1080px.
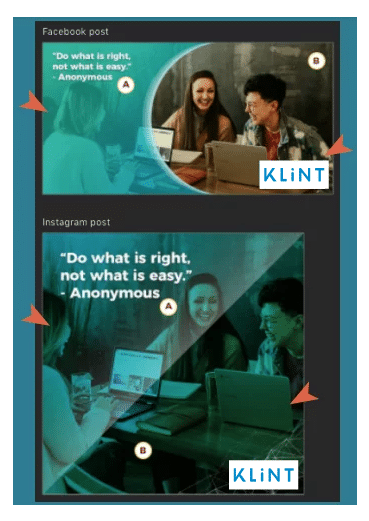
Step 5. Define variables in the Photoshop document
You use variables to define which elements in the template change.
In our template, the text (variable A) and the image (variable B) change from post to post.
There are three types of variables.
- Visibility variables
- Pixel Replacement variables
- Text Replacement variables
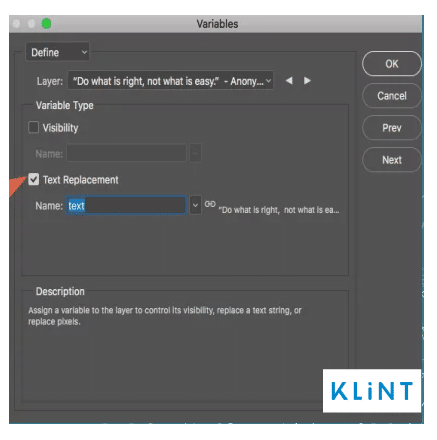
1. Select a layer that contains the content you want to define as a variable
E.g. The text layer contains your quote, or the image layer contains your paired stock image.
2. On Application Menu, choose Image > Variables > Define

3. Select one or more types of variables
E.g. If you selected a text layer, choose Text Replacement; if you selected an image layer, choose Pixel Replacement.
4. Name or choose an existing name for the variables
If your variable is the text, name the variable as ‘text’, same as the name of Column A in the CSV file we have prepared earlier.
5. For Pixel Replacement variables, set the following options
- Select a scaling method for the chosen image: (fit, fill…)
- Choose “placing alignment” inside the bounding box: (centre, left, right)
- Choose “Clip To Bounding Box” to cut off areas of the image that are outside the bounding box
- Name the variable.
If your variable is the image, name the variable as ‘image’, same as the name of Column B in the CSV file we have prepared earlier.
6. Click “OK” to save your changes
Step 6. Import the prepared Data Set
This step will show you how to load the prepared CSV/TXT file into our current PSD document.
- On Application Menu, choose Image > Variables > Data Sets
- Click Import Data Set > Select File and select the CSV/TXT file.
- Set the encoding of the text file (or leave the setting as “automatic”)
- Ticking or not “Use the first column for Data Set Names”, depends on your preference. You can still change the file-naming scheme later when generating all the graphics (Step 8).
- Ticking or not “Replacing Existing Data Sets”, depends on you, it is not relevant.
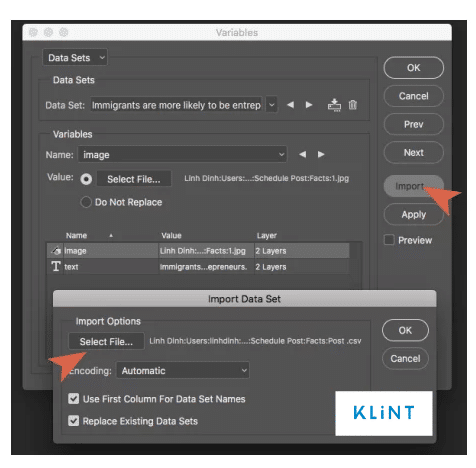
- Click “OK” to save your changes.
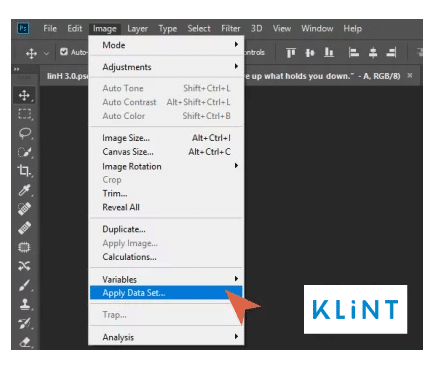
Step 7. Preview or apply a Data Set
Applying a Data Set overwrites your original document.
- Choose “Image” > “Apply Data Set”
- Select the Data Set you want to apply
- Click “Apply”.
Please note: You can also apply and preview a Data Set in the Data Set page of the Variables dialogue box.
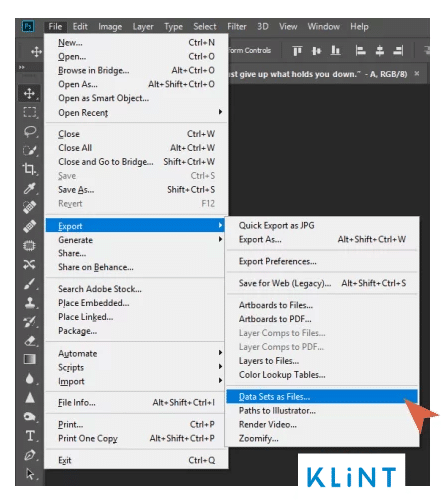
Step 8. Generate graphics using Data Sets
After applying one or more data sets, you can output, in batch mode, images as PSD files.
- Choose “File” > “Export” > “Data Sets As Files”
- Enter a base name for all files generated. You may create your own file-naming scheme if you want
- Click the “Select Folder” button to select where to store the exported files
- Choose “data sets” to export
- Click “OK” to save your changes
Step 9. Export PSD files to JPEG files
After generating data sets to PSD files, check all the elements (how they feel and look) following your corporate visual identity.
- Check all export format details in File > Export > Export Preferences
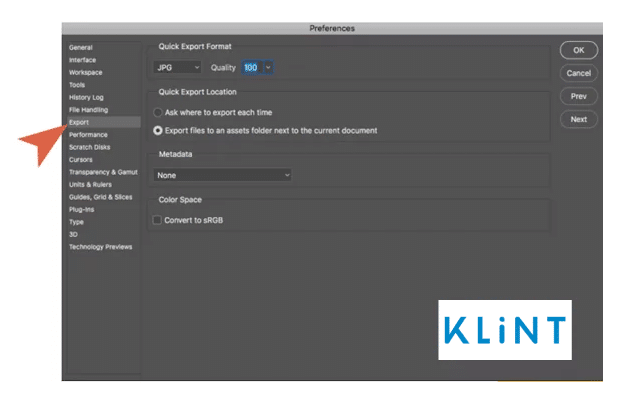
- Choose File > Export > Quick Export as JPEG
Everything clear?
In case you have troubles creating multiple files from datasets (CSV files) in Photoshop, we have found a video example for you.
Watch the following video on How to Create multiple Photoshop Files from a Data Set to learn more.
This method is super easy, and very quick. Try to believe it!
The content doesn’t have to be the same kind. It can be anything from a fact to a quote, an announcement, Ads, and more. All you need is a document where you have listed your content and its relative image.
PART 2
How to automate and schedule a large number of Facebook and Instagram posts to Buffer with images all at once
Now comes the fun part.
Have you heard of using Buffer to schedule your Facebook and Instagram posts ahead of time, instead of manually loading your posts day by day?
Definitely a super valid way of saving precious time!
Let’s say you have a huge amount of posts that are ready to see the light of day.
Wouldn’t it be great if you bulk uploaded all your posts, including text and images at the same time?
Frankly, it won’t be the easiest process ever, but if you have hundreds of ready-to-post posts in hand, it will allow you to have successfully managed your entire account feed for months.
As of August 2018, the official Buffer web application does not support bulk uploading with images (it only supports text using a CSV file).
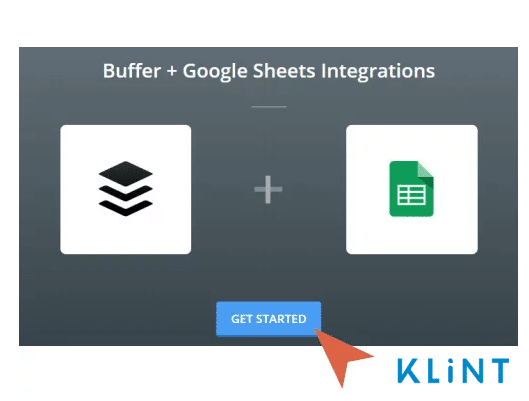
However, you can create a zap via Zapier, allowing you to connect Google Sheets with Buffer and automatically feed your information (texts and images) into your Buffer queue.
The integration of two apps happens inside a “zap“, an automatic integration in Zapier.
Please note: For the sake of a better understanding, we will use all the preparation work from part 1 as an example, including the listed quotes in Part 1-Step 1 and the generated post JPEG files in Part 1-Step 8.
Step 1. Gathering all needed information for the post: Description, Image, and Time Scheduling
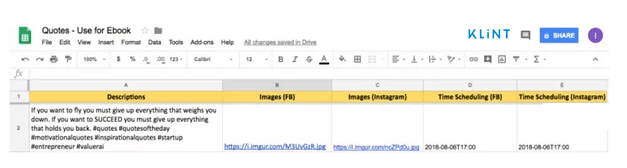
- Create a new Google Sheet and name the worksheet as “Data”.
- In Column A, list all the chosen quotes in Part 1-Step 1 and name the column “Quotes”.
- In Column B, write a few sentences of why or how these quotes are important and how they relate to your industry or users. Insert relevant hashtags to your industry or the quote itself. Name the column “Description”.
Please Note: There are plenty of sites that can help you get keyword ideas for your hashtags, below are some examples:
Buffer already provides you with the character limitations for most of the Social Media platforms.
- Upload all the JPEG posts from Part 1-Step 8 to https://imgur.com/. This is an online image sharing community and image host where you can find images’ direct links very easily.
- Copy the direct links of those uploaded images.
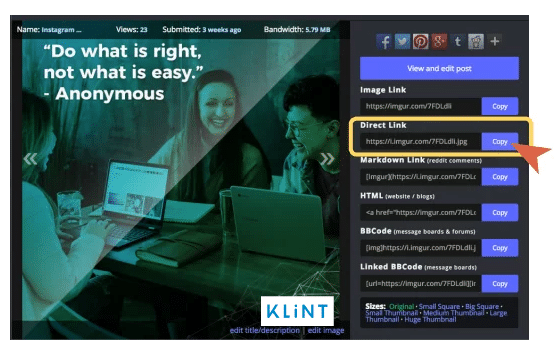
- List down in Column C (Facebook) and D (Instagram), on the adjacent row to the relevant quotes.
- Decide on how many times you want to post in a week and select the best hours/days of the week per platform.
Some days are better to post than others – make sure to find out and monitor what works best for your business!
You can base it off on your current statistics, or use Buffer’s recommended time of the day to schedule your posts: Settings > Posting Schedule.

- Choose the time and day, using Zapier DateTime format:
Tomorrow at noon
Next Friday at 7 pm
2/13/2014 8 pm EST
2014-02-26T16:56 (standard ISO format)
1393462573 (a unix timestamp)
List it in Column E (Facebook) and F (Instagram).
Step 2. Connect Google Sheets & Buffer using Zapier
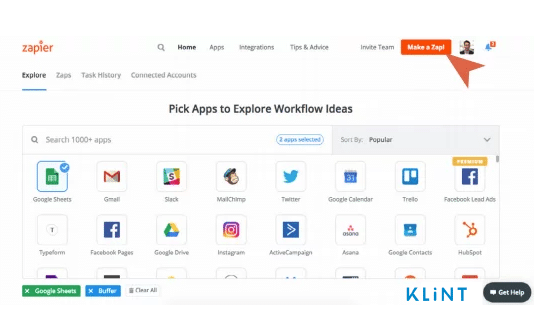
- Sign up or log in on Zapier
- Pick “Buffer” and “Google Sheets” in the list of all the applications
- Click “Make a Zap!”
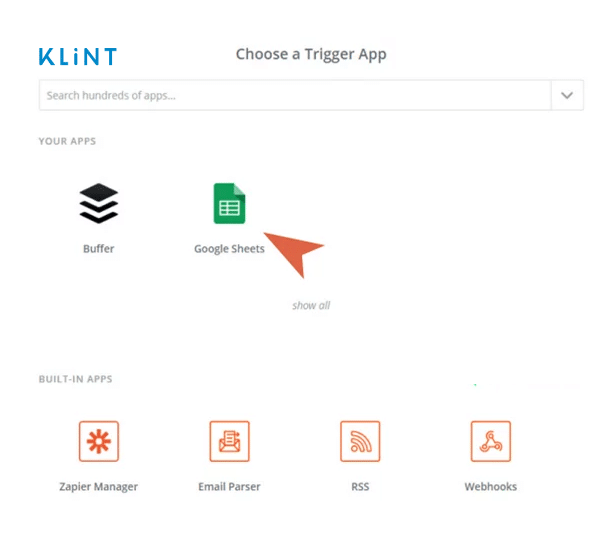
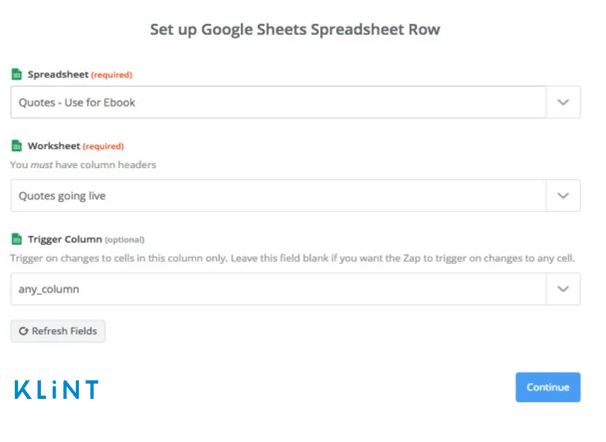
Step 3. Set up Google Sheets in Zapier
- Choose Google Sheets as your trigger app > Save & Continue
- Choose Trigger > Save & Continue
E.g. Here we selected “New or Updated Spreadsheet Row” as a trigger.
- Connect Google Sheets with Zapier by signing in on your Google Drive
- Make a new Google worksheet, call it “Quotes going live” and give it 5 columns:
- A Descriptions (with hashtags)
- B Images (Facebook)
- C Images (Instagram)
- D Time Scheduling (Facebook)
- E Time scheduling (Instagram)
- Copy the first row from Part1-Step1 worksheet “Data” to the new worksheet so that later the zap has some sample data to pick up.
- Setup Google Sheets Spreadsheet Row > Continue
- Pull in Samples > Fetch & Continue
If the test is successful, You can review your spreadsheet row to make sure everything looks okay. Zapier will use this as a sample for setting up the rest of your Zap.
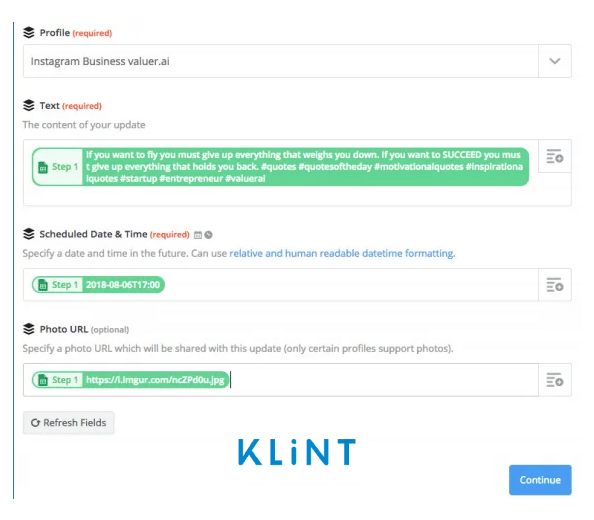
Step 4. Set up Buffer in Zapier to complete the Zap
- Select Buffer > Continue
- Select Zapier Action (Here we selected Add to Schedule > Continue)
- Connect Buffer with Zapier by signing in on your Buffer account.
- Set up Buffer Template > Continue
Here’s the configuration:
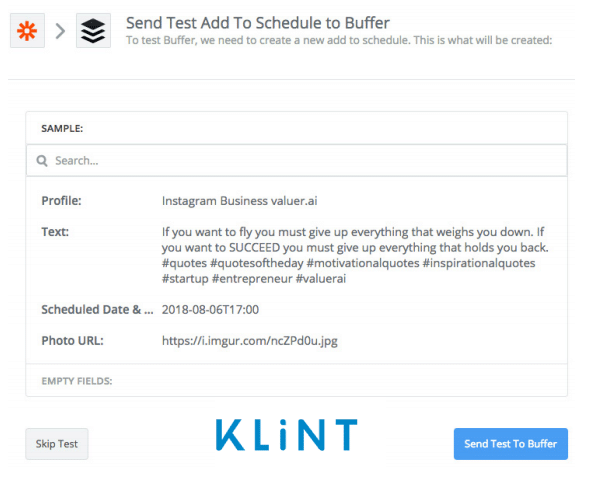
- Check the post details and choose “Send Test to Buffer”.
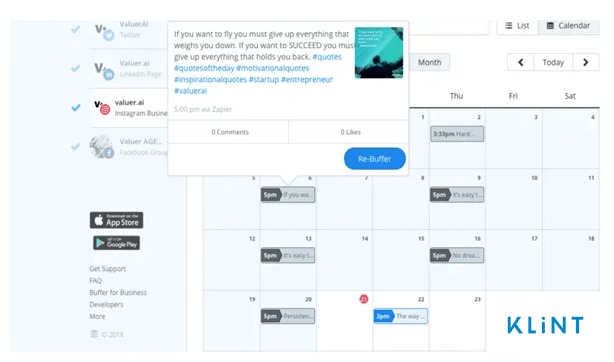
You now can check if your buffer queue looks like this.
- Once your zap’s up and running, you can paste the rest of your data into the connected worksheet “Quotes going live”.
This will finally add all information to Buffer thanks to the trigger we have set.
Using this technique, you can bulk upload posts to multiple platforms, just by changing your Buffer Profile when setting up Buffer template in Step 2.
And there you go! Now you know how to schedule and automate your Facebook and Instagram posts.
If you want to further improve your marketing strategies, make sure to read our other blog posts and to visit us on our website.
We can schedule and automate your Instagram posts for you… and so much more!
What are you waiting for?
Resources
Here are listed the resources we have relied on the most in the process of writing this guide on social media automation:
- How to create 50 unique posts for Facebook and Instagram using a dataset.
Photoshop Files From Data Sets
Social Media Image Sizes: A Quick Reference Guide for Each Network
Character limits for each social network
How to Build Social Media Branding Guidelines That Will Make Your Brand Memorable
- How to automate and schedule a large number of Instagram and Facebook posts to Buffer with images all at once.
How to Bulk Upload And Schedule Posts to Buffer WITH IMAGES Using BulkPublish
Getting started with Bulk Buffer
The Top 10 Secret Buffer Hacks and Features
How to Automatically Generate Tweets with Images and Hashtags for Your Buffer Queue

![How to Upload Edited TikTok Videos from PC to TikTok [2021 Update]](https://klintmarketing.com/wp-content/uploads/2021/09/PC-to-tiktok-feature-image-1080x675.jpg)
Great content! Super high-quality! Keep it up! 🙂